My objective here is to perform the basic configuration in a vSRX machine to provide Intenet access for its users sitting inside the local area network. For that purpose, I’m setting up DHCP, DNS, Default Route, Zones, Policies, and Source NAT in this virtual appliance. To get started, I designed a network topology in GNS3 as follows:
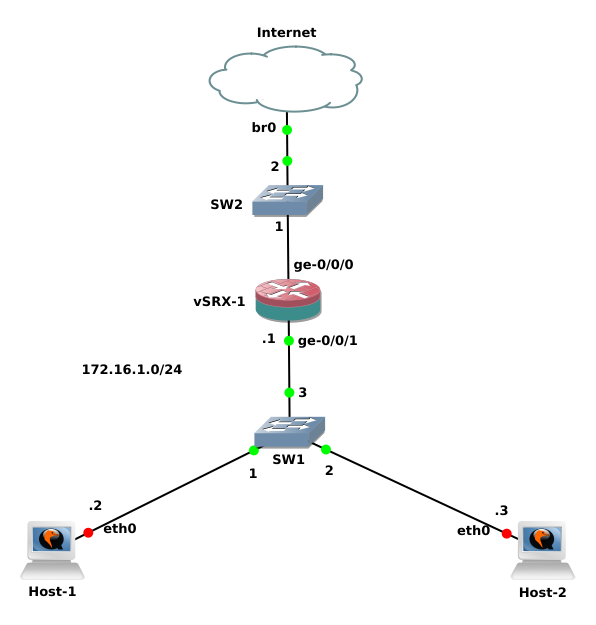
Lab Overview
As you can see in the network diagram, I’ve put Internet or Cloud at the top whose interface is bridged to my computer’s interface. It’s this bridging with physical interface that allows the devices inside GNS3 environment to communicate with external network or Internet. Then, below Internet, I’ve kept an Ethernet switch. In Enterprise or large deployments, this switch can be referred to as a Link Switch because links from ISPs are terminated to this switch. In this particular scenario, the only reason I’m keeping it here is because vSRX cannot be directly connected with Cloud or Internet component in GNS3.

Then comes the main component of this lab i.e. vSRX appliance whose ge-0/0/0 interface is connected with Link switch as uplink and ge-0/0/1 inteface is connected as downlink to LAN. Below vSRX, I’ve put another Ethernet switch which connects the end user hosts to the vSRX. This is a very simple network design, almost similar to that of home or small office environment. Now, let’s get started with the configuration of our vSRX.
Since this is a fresh vSRX machine, I’m going to start from the beginning itself. First of all, as soon as the vSRX boots up and presents the login prompt, I enter the username “root” and continue with empty password. It takes me to the shell prompt containing “root%” symbol for FreeBSD system upon which the Junos software is based. To enter into Junos, I enter the command cli. Once I get inside Junos, I am greeted by another prompt containing “root>” symbol. This state is called Operational Mode as we can perform operational analysis and management in this mode. Then, there’s another mode called Configuration mode, which can be accessed by entering configure or edit command from Operational mode. This mode is represented by the prompt containing “root#” symbol. It is this mode from which we perform all the configurations for our Juniper device.
Initial Configuration
Once I’m inside Configuration mode, the first thing I am going to do is to set up hostname, domain-name and root authentication for my vSRX.
root# set system host-name vSRX
root# set system domain-name sajjan.com.np
root# set system root-authentication plain-password
root# commit
Note that it is mandatory to commit any configuration changes made in Junos to take affect. After commiting above configuration, my vSRX machine’s hostname, domain-name and root authentication are changed. Then, I configure interfaces and DNS to it so that it can resolve domain names.
root@vSRX# set interfaces ge-0/0/0 unit 0 family inet address 192.168.1.169/24
root@vSRX# set interfaces ge-0/0/1 unit 0 family inet address 172.16.1.1/24
root@vSRX# set system name-server 192.168.1.100
root@vSRX# set system name-server 8.8.8.8
Since I’m going to setup my internal network in ge-0/0/1 interface of vSRX and I want my LAN hosts to use vSRX’s IP address as DNS server, I need to configure DNS proxy in this particular interface.
root@vSRX# set system services dns dns-proxy interface ge-0/0/1.0
Configuring DHCP Server
Next, I’m configuring DHCP server in my vSRX machine and then defining DHCP pool for my local network. Here, I’m assigning the network address of 172.16.1.0/24 with gateway of 172.16.1.1 (IP address of ge-0/0/1 interface) and name server address of 172.16.1.1. The DHCP server will assign IP addresses to hosts from 172.16.1.10 to 172.16.1.20. Also, the hosts in the LAN will belong to the domain-name sajjan.com.np.
root@vSRX# set system services dhcp pool 172.16.1.0/24 address-range low 172.16.1.10
root@vSRX# set system services dhcp pool 172.16.1.0/24 address-range high 172.16.1.20
root@vSRX# set system services dhcp pool 172.16.1.0/24 default-lease-time 3600
root@vSRX# set system services dhcp pool 172.16.1.0/24 domain-name sajjan.com.np
root@vSRX# set system services dhcp pool 172.16.1.0/24 name-server 172.16.1.1
root@vSRX# set system services dhcp pool 172.16.1.0/24 router 172.16.1.1
Default Route to Internet
Now to allow hosts in the internal network to access the internet, I define a static (default) route using the next-hop address as gateway of external network i.e. 192.168.1.0.
root@vSRX# set routing-options static route 0.0.0.0/0 next-hop 192.168.1.1
Security Zones
Next thing I setup is Security zone. A security zone is a group of hosts or networks based on the security requirements. Here, I create a zone called External facing external network or Internet and assign interface ge-0/0/0.0 to it. For now, I’m allowing all types of services from the external network to enter this device, which is defined as host-inbound-traffic.
root@vSRX# set security zones security-zone External interfaces ge-0/0/0.0 host-inbound-traffic system-services all
Similarly, I create a zone facing my internal network or LAN. Here, I’m assigning interface ge-0/0/1.0 and I’m allowing all services to pass from LAN into the device.
root@vSRX# set security zones security-zone Internal address-book address LAN-1 172.16.1.0/24
root@vSRX# set security zones security-zone Internal interfaces ge-0/0/1.0 host-inbound-traffic system-services all
root@vSRX# set security zones security-zone Internal interfaces ge-0/0/1.0 host-inbound-traffic system-services dhcp
Source NAT
Moving into next step, I’m configuring Network Address Translation (NAT) in this device. For this scenario, I need to allow all hosts in LAN to access Internet and I don’t have specific host that needs to be accessed from public network. So, I’m just using Source NAT here.
root@vSRX# set security nat source rule-set Internet-NAT from zone Internal
root@vSRX# set security nat source rule-set Internet-NAT to zone External
root@vSRX# set security nat source rule-set Internet-NAT rule Internet-NAT-1 match source-address 172.16.1.0/24
root@vSRX# set security nat source rule-set Internet-NAT rule Internet-NAT-1 then source-nat interface
Security Policies
Until now, I’ve already configured my interfaces, DHCP, security zones and NAT. But doing all of these configuration cannot pass traffic between LAN and Internet via this vSRX device. For that, we need to have the security policies which will determine if the connection will be permitted or denied. Remember that Junos by default denies everything until security polices are defined to permit them. For now, I’m just going to allow everything from zone Internal to zone External. Since sessions matching security policies are bidirectional, we don’t have to create a reverse policy for this case.
root@vSRX# set security policies from-zone Internal to-zone External policy Internet-Access match source-address LAN-1
root@vSRX# set security policies from-zone Internal to-zone External policy Internet-Access match destination-address any
root@vSRX# set security policies from-zone Internal to-zone External policy Internet-Access match application any
root@vSRX# set security policies from-zone Internal to-zone External policy Internet-Access then permit
Screen Options
Finally, I’m also configuring some screen options in my vSRX device. Implementing Screen options can protect the device and its associated networks from various security attacks like DoS, port scanning, OS probes, Session table overflowing, and so on. Junos comes with a wide range of screen options which can be utilized to protect our network hosts. Here, I’m just setting up a few of them:
root@vSRX# set security screen ids-option Screen-Internet icmp ip-sweep threshold 1000
root@vSRX# set security screen ids-option Screen-Internet icmp flood threshold 200
root@vSRX# set security screen ids-option Screen-Internet tcp port-scan threshold 1000
root@vSRX# set security screen ids-option Screen-Internet tcp syn-flood alarm-threshold 500
root@vSRX# set security screen ids-option Screen-Internet tcp syn-flood attack-threshold 1000
root@vSRX# set security screen ids-option Screen-Internet tcp syn-flood destination-threshold 500
root@vSRX# set security screen ids-option Screen-Internet tcp syn-flood timeout 30
root@vSRX# set security screen ids-option Screen-Internet udp flood threshold 500
root@vSRX# set security screen ids-option Screen-Internet udp udp-sweep threshold 1000
root@vSRX# set security screen ids-option Screen-Internet limit-session source-ip-based 100
root@vSRX# set security screen ids-option Screen-Internet limit-session destination-ip-based 5000
root@vSRX# set security flow syn-flood-protection-mode syn-cookie
Well, that’s a simple introduction and guide to Juniper Network’s SRX or vSRX series devices. I hope you’ve found it informative and useful. Please let me know of your suggestions or feedback in the Comments Section below. Thank you!