Hello! In this blog, I’m going to write about how to install CentOS 6.5 Minimal operating system. To briefly introduce CentOS; it is an open-source operating system based on Linux kernel and derived from Red Hat Enterprise Linux. It is developed and maintained by the open source community. This open community itself provides support for the users of CentOS.
Installing CentOS 6.5 Minimal
For this post, I’m installing CentOS version 6.5 Minimal. You can get it from this download link. I’m also installing this system in Vmware vSphere. If you need to install it in some other virtual platform or in physical server, follow the pre-installation tasks accordingly. For Vmware vSphere, if you don’t already know how to create a new virtual machine, follow this post:
Now that my guest VM is booted up with installer image of CentOS, I can begin the installation procedure. As soon as the OS boots, the following screen appears:
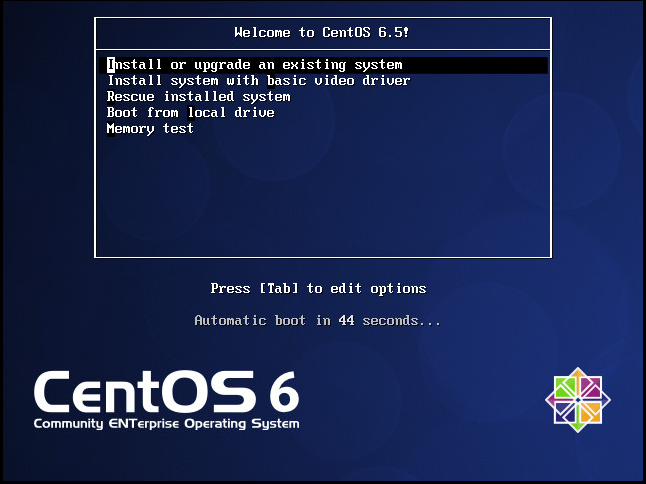
I selected Install or upgrade an existing system because I’m going to install it. The other options are useful for their respective tasks.

The installer then asks us whether to test the boot media or skip it. If you’d like to check the integrity of your installation media for assurance, you can select OK and hit enter. In my case, I simply skipped it.

Once the initial system load completes, the installer launches a welcome screen as shown above. Click Next to continue.

Choose you language for the installation process.

Choose the keyboard layout for the system. In my case, I’m choosing U.S. English.

Specify which type of devices you would like to have for your system. For beginners, simply choose Basic Storage Devices because these are for Typical storage devices or Directly Attached Storage (DAS). In case you’ve got Network Attached Storage (NAS) like iSCSI or FC or FCoE or NFS, choose the option Specialized Storage Devices. In my case, I’ve got directly attached disk to my system, so I chose Based Storage Devices.

After the storage device is selected, the installer asks us whether to Discard any data in the disk or Keep it. I’m sure that my disk is empty and I have no reason for keeping any data, so I simply discarded any data. In case you have an old or already used disk which might contain some important data, you may need to select No, keep any data option.

Then, the installer asks us to enter the hostname for the newly created system. You can enter any name that describes your system. We can also change the hostname anytime after the system is installed.

The installer asks us to provide our location. I chose Asia/Kathmandu. You can choose your location accordingly.

Next, we need to set the password for the “root” user. This is the login credential we will be using once the system is installed and ready for use. It is also exclusively used for numerous administrative tasks requiring super user privilege. We can create new users later, after the installation.

Now comes somehow a little difficult step i.e. Disk Provisioning. For beginners, the Use All Space would be the easiest way because the installer itself provisions the disk space based on standard layout or format, and the user doesn’t have to manually specify how much swap, /, /boot, /tmp, /opt, or any other partition space for the system. The second, third and fourth options are useful if you already have another system installed in your machine or for some reason, you don’t want your new CentOS system to take the entire disk space.
The option Replace Existing Linux System(s) is used if you’ve got another linux system already installed and want to replace it with this system, including its boot loader. The option Shrink Current System helps you to keep your existing system by shrinking its filesystem and creating new disk space for the new CentOS system. And the option Use Free Space is also similar to the earlier option, except that instead of shrinking the existing filesystem, it uses a free space or partition if available. Both third and fourth options allow for multi-boot scenario.
Finally, the option Create Custom Layout provides the maximum control and flexibility, therefore it is intended for those who know what they are doing. Inside this, we can select which disk(s) or disk space within a disk to be used for the system. Then, we need to create filesystem partitions over the selected disk space. While creating partition, we can choose its type as Standard or Logical Volume. If we’d like to have standard partition layout, we can simply create each required partition as Standard and specify its name, size and filesystem type. Some of the basic partitions are Swap, root (/), /boot, /tmp, /home, /var, etc. If you want to configure custom partitioning for your CentOS system, please read my blog on this topic:
For Logical Volume, we first need to create a /boot partition as Standard partition because the system cannot boot from a logical volume. Provisioning the size between 400 MB to 2 GB for /boot is enough. Then, we can create a Logical Volume for the rest of the disk space with the option of Maximum Allowed so that no disk space goes unused. Inside the logical volume group, other partitions are created as the logical volumes. The benefit of Logical Volume is that it provides dynamic disk provisioning and high flexibility for future administration.

After the disk provisioning step is completed, the installer asks for the final confirmation. We can Go back to our configurations if we need to. Clicking on Write changes to disk begins the final installation of the system and cannot be interrupted or reversed.

Once the installation completes, we can Reboot the system and start using our newly installed CentOS 6.5 Minimal operating system.

After the system boots up, it asks us to enter our login username and password. For the first time, use “root” as username and the password you entered during the installation. Your CentOS 6.5 Minimal operating system is now ready for use.
If you would like to learn about the initial configuration for CentOS, please read this article:
I hope you found it informative. Please let me know in the below Comments section if you’ve any question or suggestion for me.
Leave a Reply