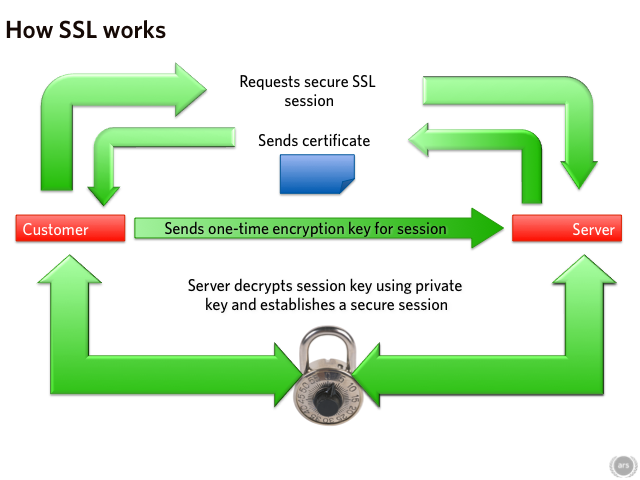
Hey there! In this post, I’m going to share my experience on installing a commercial SSL certificate in Zimbra server. Before I get into the actual installation, let’s briefly discuss about how SSL generally works.
First, we need to generate a Certificate Signing Request (CSR) in our server. If you don’t know how to generate it, you should look at the corresponding documentation for your server or application. There are also numerous online CSR generation sites, which prepare the appropriate OpenSSL command for you. You can then enter this command in your server. Next, you’ll need to provide some basic information about your company to include in the certificate.
CSR is the file, which we need to provide to our certificate authority to get our signed certificate. While generating CSR, a private key is also created. Please remember that you shouldn’t share this private file to anyone. It is also a best practice to encrypt this file with a strong password while storing or transferring.
Based on our provided CSR, our Certificate Authority (CA) will generate and sign a certificate on our behalf. That is obviously after we make necessary purchase. CA’s generally provide us the signed certificate along with their Certificate Chain or CA bundle file. We’ll then install these certificates into our server. Once completed correctly, our server will start to decrypt all of its secured communications using its private key and its authority will be verifiable through its certificate. Thus, the visitor’s web browser will display that lovely green secured signal in front of our site address.
Installation
I hope you now understand the fundamentals of SSL certificate. Let’s now get into the installation of SSL certificate. I’m following instructions from this Zimbra wiki. In my case, I’m installing Commodo certificate in my Zimbra 8.5 server. For this purpose, I’m using this as online CSR generation. My OpenSSL command looks like this:
[code language=”bash”]
$ sudo openssl req -new -newkey rsa:2048 -nodes -out Sajjan.csr -keyout Sajjan.key -subj "/C=NP/ST=Bagmati/L=Kathmandu/O=Sajjan Blog/OU=IT/CN=Sajjan"
[/code]
Then, I sent my CSR file to my CA. Then after I received my signed certificate and CA bundle in a zipped file, I did following steps:
First, verify the validity of the certificate and CA bundle with private key. Here’s the command I entered for it and its output:
[code language=”bash”]
# Note: I’ve already put all my private key and certificates into /opt/zimbra/ssl/zimbra/commercial/ path and named as in below command. Also, permission for commercial.key is set to 740
$ sudo chmod 740 /opt/zimbra/ssl/zimbra/commercial/commercial.key
$ sudo /opt/zimbra/bin/zmcertmgr verifycrt comm commercial.key commercial.crt commercial_ca.crt
** Verifying commercial.crt against commercial.key
Certificate (commercial.crt) and private key (commercial.key) match.
XXXXX ERROR: Invalid Certificate: commercial.crt: C = GB, ST = Greater Manchester, L = Salford, O = COMODO CA Limited, CN = COMODO RSA Certification Authority
error 2 at 2 depth lookup:unable to get issuer certificate
[/code]
Okay, so the certificate verification failed. In this case, the private key and certificate matched. Note, these might sometimes not even match. In that case, verify if you’re using the correct key and certificate, and the permissions to key file is set to right value. So, I’ve some issue with my issuer certificate. It turns out Commodo didn’t include its Root certificate in the provided CA bundle, although it contained other two certificates. Next, I downloaded their Root certificate from their site and prepended it to my CA bundle file. Then, I ran my above command again with success:
[code language=”bash”]
$ sudo /opt/zimbra/bin/zmcertmgr verifycrt comm commercial.key commercial.crt commercial_ca.crt
** Verifying commercial.crt against commercial.key
Certificate (commercial.crt) and private key (commercial.key) match.
Valid Certificate: commercial.crt: OK
[/code]
As you can see, this time the verification completed successfully. So, I can now go ahead and deploy it to my server.
[code language=”bash”]
$ sudo /opt/zimbra/bin/zmcertmgr deploycrt comm commercial.crt commercial_ca.crt
** Verifying commercial.crt against /opt/zimbra/ssl/zimbra/commercial/commercial.key
Certificate (commercial.crt) and private key (/opt/zimbra/ssl/zimbra/commercial/commercial.key) match.
Valid Certificate: commercial.crt: OK
** Copying commercial.crt to /opt/zimbra/ssl/zimbra/commercial/commercial.crt
cp: `commercial.crt’ and `/opt/zimbra/ssl/zimbra/commercial/commercial.crt’ are the same file
** Appending ca chain commercial_ca.crt to /opt/zimbra/ssl/zimbra/commercial/commercial.crt
cp: `commercial_ca.crt’ and `/opt/zimbra/ssl/zimbra/commercial/commercial_ca.crt’ are the same file
** Importing certificate /opt/zimbra/ssl/zimbra/commercial/commercial_ca.crt to CACERTS as zcs-user-commercial_ca…done.
** NOTE: mailboxd must be restarted in order to use the imported certificate.
** Saving server config key zimbraSSLCertificate…done.
** Saving server config key zimbraSSLPrivateKey…done.
** Installing mta certificate and key…done.
** Installing slapd certificate and key…done.
** Installing proxy certificate and key…done.
** Creating pkcs12 file /opt/zimbra/ssl/zimbra/jetty.pkcs12…done.
** Creating keystore file /opt/zimbra/mailboxd/etc/keystore…done.
** Installing CA to /opt/zimbra/conf/ca…done.
[/code]
Let’s also verify that our certificate has really been deployed:
[code language=”bash”]
$ sudo /opt/zimbra/bin/zmcertmgr viewdeployedcrt
::service mta::
notBefore=Aug 21 00:00:00 2017 GMT
notAfter=Aug 21 23:59:59 2018 GMT
subject= /C=NP/postalCode=44600/ST=Bagmati/L=Kathmandu/street=Kalanki/O=Sajjan Blog/OU=IT/OU=PremiumSSL Wildcard/CN=*.sajjan.com.np
issuer= /C=GB/ST=Greater Manchester/L=Salford/O=COMODO CA Limited/CN=COMODO RSA Organization Validation Secure Server CA
SubjectAltName= *.sajjan.com.np, sajjan.com.np
::service proxy::
notBefore=Aug 21 00:00:00 2017 GMT
notAfter=Aug 21 23:59:59 2018 GMT
subject= /C=NP/postalCode=44600/ST=Bagmati/L=Kathmandu/street=Kalanki/O=Sajjan Blog/OU=IT/OU=PremiumSSL Wildcard/CN=*.sajjan.com.np
issuer= /C=GB/ST=Greater Manchester/L=Salford/O=COMODO CA Limited/CN=COMODO RSA Organization Validation Secure Server CA
SubjectAltName= *.sajjan.com.np, sajjan.com.np
::service mailboxd::
notBefore=Aug 11 00:00:00 2017 GMT
notAfter=Aug 11 23:59:59 2018 GMT
subject= /C=NP/postalCode=44600/ST=Bagmati/L=Kathmandu/street=Kalanki/O=Sajjan Blog/OU=IT/OU=PremiumSSL Wildcard/CN=*.sajjan.com.np
issuer= /C=GB/ST=Greater Manchester/L=Salford/O=COMODO CA Limited/CN=COMODO RSA Organization Validation Secure Server CA
SubjectAltName= *.sajjan.com.np, sajjan.com.np
::service ldap::
notBefore=Aug 21 00:00:00 2017 GMT
notAfter=Aug 21 23:59:59 2018 GMT
subject= /C=NP/postalCode=44600/ST=Bagmati/L=Kathmandu/street=Kalanki/O=Sajjan blog/OU=IT/OU=PremiumSSL Wildcard/CN=*.sajjan.com.np
issuer= /C=GB/ST=Greater Manchester/L=Salford/O=COMODO CA Limited/CN=COMODO RSA Organization Validation Secure Server CA
SubjectAltName= *.sajjan.com.np, sajjan.com.np
[/code]
To implement the new certificate, let’s restart our zimbra service.
[code language=”bash”]
$ su zimbra
$ zmcontrol restart
[/code]
Well, this is how I installed the commercial SSL certificate in my Zimbra server.
I hope this has been useful for you. Please let me know if you’ve any query or feedback in the Comments section below. If you found it informative, don’t forget to share it with your friends. Happy Learning!
Leave a Reply