Hello! I’m going to dedicate this post to talk about Policy Based IPSec VPN in Juniper Networks device. For the purpose of setting up IPSec VPN, I’ve prepared a lab in GNS3 using three vSRX machines, one Cisco 2691 router and three Cirros machines. However, for now, I’ll be using only two vSRX devices for policy based VPN because I plan to use other one for configuring Route based VPN. Here’s how my lab topology looked like:
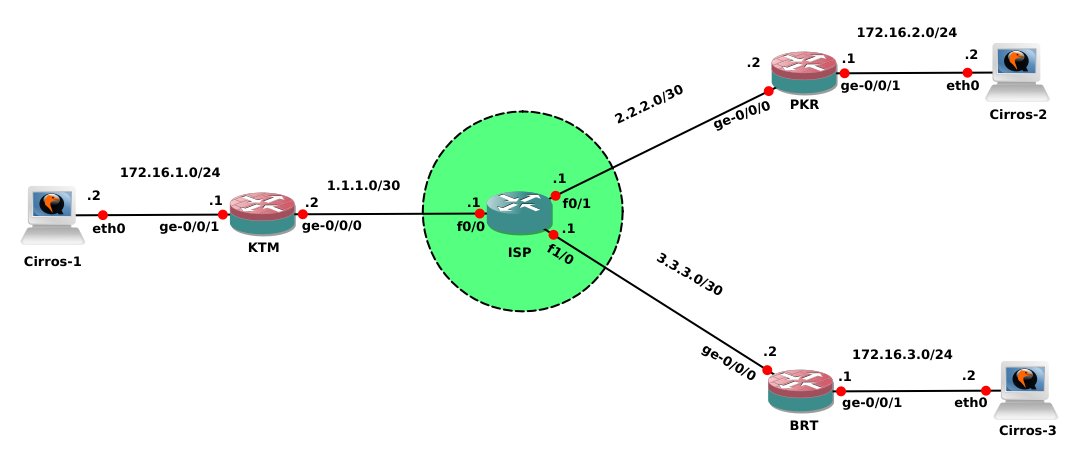
Lab Overview
For this particular post, let’s just look at the vSRX named as KTM on the left, Cisco router named as ISP in middle and vSRX named as PKR on the top right. Here, I’m going to setup policy based IPSec VPN between the sites KTM and PKR. For my lab topology, I’m using KTM as a head-office site, and PKR and BRT as the branches. Since I need to allow access between local area network of one site and that of other site, I’m using IPSec VPN between these two sites. Now, let’s get started with the configuration:
Basic Configuration
Assuming that I’ve got fresh installation of vSRX devices, let’s start this setup from the beginning itself i.e. definition of root authentication, system hostname, interfaces and security zones. In real scenario, you might also want to configure DNS, DHCP, NAT, and so on.
[code language=”bash”]
root# set system root-authentication plain-password
root# set system host-name KTM
root# commit [/code]
Here, KTM vSRX has two interfaces: ge-0/0/0 connecting to ISP router and ge-0/0/1 connecting LAN.
[code language=”bash”]
root@KTM# set interfaces ge-0/0/0 unit 0 family inet address 1.1.1.2/30
root@KTM# set interfaces ge-0/0/1 unit 0 family inet address 172.16.1.1/24 [/code]
Junos, by default comes with two security zones named trust and untrust, and their corresponding interfaces assignment. I usually like to delete the default config and set my own custom configuration. I’m defining a security zone called DC-Net containing LAN and interface ge-0/0/1. All system services will be allowed from this zone to the device.
[code language=”bash”]root@KTM# delete security zones security-zone trust interfaces ge-0/0/0.0
root@KTM# set security zones security-zone DC-Net interfaces ge-0/0/1
root@KTM# set security zones security-zone DC-Net host-inbound-traffic system-services all[/code]
Similary, I’m creating another security zone named as Public-Net containing interface ge-0/0/0, which is facing the ISP. Only Ping and IKE traffic will be allowed from this zone to the device.
[code language=”bash”]root@KTM# set security zones security-zone Public-Net host-inbound-traffic system-services ike
root@KTM# set security zones security-zone Public-Net host-inbound-traffic system-services ping
root@KTM# set security zones security-zone Public-Net interfaces ge-0/0/0[/code]
I also define the address books for the networks and hosts in the zones I created. This helps in easier identification, categorization and use of networks and hosts during the configuration process. It also makes things extremely quick and effective when we need to make modifications in addresses or associated configurations.
[code language=”bash”]root@KTM# set security zones security-zone DC-Net address-book address DC-Network 172.16.1.0/24
root@KTM# set security zones security-zone DC-Net address-book address DC-Server-1 172.16.1.2/32
root@KTM# set security zones security-zone DC-Net address-book address-set DC-Servers address DC-Server-1[/code]
[code language=”bash”]root@KTM# set security zones security-zone Public-Net address-book address PKR-Network 172.16.2.0/24
root@KTM# set security zones security-zone Public-Net address-book address PKR-Server-1 172.16.2.2/32[/code]
Before completing our basic configuration, let’s also add a default route using next hop address as the ISP router’s IP address.
[code language=”bash”]root@KTM# set routing-options static route 0.0.0.0/0 next-hop 1.1.1.1[/code]
IPSec Phase I Configuration
Now, begins the section where we actually configure our IPSec VPN. IPSec contains two phases: Phase 1 – IKE Association and Phase 2 – IPSec VPN. So, let’s first setup our IKE configuration. Defining the IKE proposal is the next thing we need to do. This proposal creation process can be skipped if we would like to use the available proposal sets (basic, compatible or standard).
[code language=”bash”]root@KTM# edit security ike
root@KTM# set proposal KTM-PKR-IKE-Phase1-Proposal authentication-method pre-shared-keys
root@KTM# set proposal KTM-PKR-IKE-Phase1-Proposal dh-group group2
root@KTM# set proposal KTM-PKR-IKE-Phase1-Proposal authentication-algorithm sha1
root@KTM# set proposal KTM-PKR-IKE-Phase1-Proposal encryption-algorithm aes-128-cbc[/code]
Then, we need to configure the IKE phase 1 policy. Here, we mainly choose the mode, proposal and pre-shared key for the VPN. For now, I’m using main mode as I’ve got static IP addresses at both of my peers. However, we would need to set aggressive mode if we’ve dynamic IP address at one of the peers and then, the peer with dynamic IP should be the one to begin the IKE negotiation. We then call the proposal we defined above and set the pre-shared key for authentication between the peers.
[code language=”bash”]root@KTM# set policy KTM-PKR-IKE-Phase1-Policy mode main
root@KTM# set policy KTM-PKR-IKE-Phase1-Policy proposals KTM-PKR-IKE-Phase1-Proposal
root@KTM# set policy KTM-PKR-IKE-Phase1-Policy pre-shared-key ascii-text Secret@123[/code]
The last step in Phase I is to configure IKE gateway. Here, we call the policy we created above, set the peer’s IP address and external interface participating in VPN.
[code language=”bash”]root@KTM# set gateway GW-PKR ike-policy KTM-PKR-IKE-Phase1-Policy
root@KTM# set gateway GW-PKR address 2.2.2.2
root@KTM# set gateway GW-PKR external-interface ge-0/0/0[/code]
IPSec Phase II Configuration
Now that we’ve got our IPSec Phase I configuration completed, we can proceed to the Phase II of the VPN. Basically, our Phase I will create a tunnel between the two participating peers and Phase II will control the traffic flowing through this tunnel. In phase II, we define proposal, policy and VPN to complete our IPSec setup.
[code language=”bash”]root@KTM# top edit security ipsec
root@KTM# set proposal KTM-PKR-IPSec-Phase2-Proposal protocol esp
root@KTM# set proposal KTM-PKR-IPSec-Phase2-Proposal authentication-algorithm hmac-sha1-96
root@KTM# set proposal KTM-PKR-IPSec-Phase2-Proposal encryption-algorithm aes-128-cbc[/code]
Then, let’s define the IPSec phase II policy with the appropriate PFS option and proposal.
[code language=”bash”]root@KTM# set policy KTM-PKR-IPSec-Phase2-Policy perfect-forward-secrecy keys group2
root@KTM# set policy KTM-PKR-IPSec-Phase2-Policy proposals KTM-PKR-IPSec-Phase2-Proposal[/code]
To complete our IPSec Phase II config, let’s define a VPN which will later be referenced by the security policies to pass traffic between remote sites. To set it, we need to provide the IKE gateway that we created in the phase I gateway configuration and the IPSec policy. We can also provide additional option like “establish-tunnels immediately” to start VPN as soon as the necessary conditions are met.
[code language=”bash”]root@KTM# set vpn KTM-PKR-VPN ike gateway GW-PKR
root@KTM# set vpn KTM-PKR-VPN ike ipsec-policy KTM-PKR-IPSec-Phase2-Policy
root@KTM# set vpn KTM-PKR-VPN establish-tunnels immediately[/code]
This completes our IPSec VPN configuration in Juniper Networks device.
Security Policies
Well, as the title of this post suggested, this is an example of a Policy based IPSec VPN. So, the security policies play a very important role in this setup as they’re the ones which control the IPSec traffic. Let’s just begin the configuration of security policies with the outbound connections i.e from zone DC-Net to zone Public-Net. These policies will match all the traffic originating from DC-Network to PKR-Network and pass them through the IPSec VPN tunnel called KTM-PKR-VPN that we created above. We also define a pair-policy for the traffic matching the reverse connections.
[code language=”bash”]root@KTM# top delete security policies
root@KTM# edit security policies
root@KTM# set from-zone DC-Net to-zone Public-Net policy KTM-PKR-VPN match source-address DC-Network
root@KTM# set from-zone DC-Net to-zone Public-Net policy KTM-PKR-VPN match destination-address PKR-Network
root@KTM# set from-zone DC-Net to-zone Public-Net policy KTM-PKR-VPN match application any
root@KTM# set from-zone DC-Net to-zone Public-Net policy KTM-PKR-VPN then permit tunnel ipsec-vpn KTM-PKR-VPN
root@KTM# set from-zone DC-Net to-zone Public-Net policy KTM-PKR-VPN then permit tunnel pair-policy PKR-KTM-VPN[/code]
This policy is for all the normal traffic that originate from the internal network and are destined to the external network or Internet. Make sure this policy is placed after the policy for IPSec traffic, otherwise it’ll match everything and take its actions even for the IPSec traffic. If you’ve got your IPSec related security policy after this type of policy, use insert to place it before other policies.
[code language=”bash”]root@KTM# set from-zone DC-Net to-zone Public-Net policy Permit-Any match source-address any
root@KTM# set from-zone DC-Net to-zone Public-Net policy Permit-Any match destination-address any
root@KTM# set from-zone DC-Net to-zone Public-Net policy Permit-Any match application any
root@KTM# set from-zone DC-Net to-zone Public-Net policy Permit-Any then permit[/code]
Conversely, let’s also define security policies for the inbound traffic i.e. from Public-Net zone to DC-Net zone. It’s much like the security policy for outbound connections except that it matches opposite source and destination addresses. The tunnel pair-policy is the policy we created above for inbound traffic.
[code language=”bash”]root@KTM# set from-zone Public-Net to-zone DC-Net policy PKR-KTM-VPN match source-address PKR-Network
root@KTM# set from-zone Public-Net to-zone DC-Net policy PKR-KTM-VPN match destination-address DC-Network
root@KTM# set from-zone Public-Net to-zone DC-Net policy PKR-KTM-VPN match application any
root@KTM# set from-zone Public-Net to-zone DC-Net policy PKR-KTM-VPN then permit tunnel ipsec-vpn KTM-PKR-VPN
root@KTM# set from-zone Public-Net to-zone DC-Net policy PKR-KTM-VPN then permit tunnel pair-policy KTM-PKR-VPN
root@KTM# commit check
root@KTM# commit and-quit[/code]
This completes our entire configuration in KTM device for the proposed Policy based IPSec VPN. Now, we need to configure our next peer i.e. PKR device according to the IPSec parameters that we defined in KTM device. Otherwise, the IPSec VPN won’t work. But before we setup PKR device, let’s first prepare our ISP router. In real scenario, we don’t have access to ISP router. However, since this is my internal lab, I need to configure it to make this lab work. In ISP router, all I need to do is to assign the IP addresses to its interfaces as shown in the topology above.
[code language=”bash”]ISP# conf t
ISP# int f0/0
ISP# ip address 1.1.1.1 255.255.255.252
ISP# exit
ISP# int f0/1
ISP# ip address 2.2.2.1 255.255.255.252
ISP# end[/code]
Configuration of PKR
Actually, all of the configuration required in PKR is almost similar to that of KTM device. So, I’m just putting the entire config statements without any explanation.
[code language=”bash”]root# set system host-name PKR
root# set system root-authentication plain-password
root# delete security zones
root# set security zones security-zone PKR-Net interfaces ge-0/0/1
root# set security zones security-zone PKR-Net host-inbound-traffic system-services all
root# set security zones security-zone Public-Net host-inbound-traffic system-services ike
root# set security zones security-zone Public-Net host-inbound-traffic system-services ping
root# set security zones security-zone Public-Net interfaces ge-0/0/0
root# set interfaces ge-0/0/0 unit 0 family inet address 2.2.2.2/30
root# set interfaces ge-0/0/1 unit 0 family inet address 172.16.2.1/24
root# show | compare
root# commit[/code]
[code language=”bash”]root@PKR# set security zones security-zone PKR-Net address-book address PKR-Network 172.16.2.0/24
root@PKR# set security zones security-zone PKR-Net address-book address PKR-Server-1 172.16.2.2/32
root@PKR# set security zones security-zone PKR-Net address-book address-set PKR-Servers address PKR-Server-1
root@PKR# set security zones security-zone Public-Net address-book address KTM-Network 172.16.1.0/24
root@PKR# set security zones security-zone Public-Net address-book address KTM-Server-1 172.16.1.2/32
root@PKR# set security zones security-zone Public-Net address-book address-set KTM-Servers address KTM-Server-1
root@PKR# set routing-options static route 0.0.0.0/0 next-hop 2.2.2.1[/code]
[code language=”bash”]root@PKR# edit security ike
root@PKR# set proposal PKR-KTM-IKE-Phase1-Proposal authentication-method pre-shared-keys
root@PKR# set proposal PKR-KTM-IKE-Phase1-Proposal dh-group group2
root@PKR# set proposal PKR-KTM-IKE-Phase1-Proposal authentication-algorithm sha1
root@PKR# set proposal PKR-KTM-IKE-Phase1-Proposal encryption-algorithm aes-128-cbc
root@PKR# set policy PKR-KTM-IKE-Phase1-Policy mode main
root@PKR# set policy PKR-KTM-IKE-Phase1-Policy proposals PKR-KTM-IKE-Phase1-Proposal
root@PKR# set policy PKR-KTM-IKE-Phase1-Policy pre-shared-key ascii-text Secret@123
root@PKR# set gateway GW-KTM ike-policy PKR-KTM-IKE-Phase1-Policy
root@PKR# set gateway GW-KTM address 1.1.1.2
root@PKR# set gateway GW-KTM external-interface ge-0/0/0[/code]
[code language=”bash”]root@PKR# top edit security ipsec
root@PKR# set proposal PKR-KTM-IPSec-Phase2-Proposal protocol esp
root@PKR# set proposal PKR-KTM-IPSec-Phase2-Proposal authentication-algorithm hmac-sha1-96
root@PKR# set proposal PKR-KTM-IPSec-Phase2-Proposal encryption-algorithm aes-128-cbc
root@PKR# set policy PKR-KTM-IPSec-Phase2-Policy perfect-forward-secrecy keys group2
root@PKR# set policy PKR-KTM-IPSec-Phase2-Policy proposals PKR-KTM-IPSec-Phase2-Proposal
root@PKR# set vpn PKR-KTM-VPN ike gateway GW-KTM
root@PKR# set vpn PKR-KTM-VPN ike ipsec-policy PKR-KTM-IPSec-Phase2-Policy
root@PKR# set vpn PKR-KTM-VPN establish-tunnels immediately[/code]
[code language=”bash”]root@PKR# top edit security policies
root@PKR# set from-zone PKR-Net to-zone Public-Net policy PKR-KTM-VPN match source-address PKR-Network
root@PKR# set from-zone PKR-Net to-zone Public-Net policy PKR-KTM-VPN match destination-address KTM-Network
root@PKR# set from-zone PKR-Net to-zone Public-Net policy PKR-KTM-VPN match application any
root@PKR# set from-zone PKR-Net to-zone Public-Net policy PKR-KTM-VPN then permit tunnel ipsec-vpn PKR-KTM-VPN
root@PKR# set from-zone PKR-Net to-zone Public-Net policy PKR-KTM-VPN then permit tunnel pair-policy KTM-PKR-VPN
root@PKR# set from-zone PKR-Net to-zone Public-Net policy Permit-Any match source-address any
root@PKR# set from-zone PKR-Net to-zone Public-Net policy Permit-Any match destination-address any
root@PKR# set from-zone PKR-Net to-zone Public-Net policy Permit-Any match application any
root@PKR# set from-zone PKR-Net to-zone Public-Net policy Permit-Any then permit[/code]
[code language=”bash”]root@PKR# set from-zone Public-Net to-zone PKR-Net policy KTM-PKR-VPN match source-address KTM-Network
root@PKR# set from-zone Public-Net to-zone PKR-Net policy KTM-PKR-VPN match destination-address PKR-Network
root@PKR# set from-zone Public-Net to-zone PKR-Net policy KTM-PKR-VPN match application any
root@PKR# set from-zone Public-Net to-zone PKR-Net policy KTM-PKR-VPN then permit tunnel ipsec-vpn PKR-KTM-VPN
root@PKR# set from-zone Public-Net to-zone PKR-Net policy KTM-PKR-VPN then permit tunnel pair-policy PKR-KTM-VPN
root@PKR# commit check
root@PKR# commit and-quit[/code]
Verification and Troubleshooting
As of now, we’ve completed the IPSec VPN configuration in both of our vSRX devices. So, let’s verify if our configuration is working properly or not. Since we trying to setup an IPSec VPN in this lab, let’s first check its status.
[code language=”bash”]root@KTM> show security ike sa
Index State Initiator cookie Responder cookie Mode Remote Address
3251960 UP e2a8e7ae826c18dc 22eec17362ab46a4 Main 2.2.2.2[/code]
Well, our Phase 1 or IKE security association is up and running. This is good and expected. Let’s also view its details.
[code language=”bash”]root@KTM> show security ike sa detail
Role: Responder, State: UP
Initiator cookie: e2a8e7ae826c18dc, Responder cookie: 22eec17362ab46a4
Exchange type: Main, Authentication method: Pre-shared-keys
Local: 1.1.1.2:500, Remote: 2.2.2.2:500
Lifetime: Expires in 28673 seconds
Peer ike-id: 2.2.2.2
Xauth assigned IP: 0.0.0.0
Algorithms:
Authentication : hmac-sha1-96
Encryption : aes128-cbc
Pseudo random function: hmac-sha1
Diffie-Hellman group : DH-group-2
Traffic statistics:
Input bytes : 968
Output bytes : 884
Input packets: 5
Output packets: 4
Flags: IKE SA is created
IPSec security associations: 1 created, 0 deleted
Phase 2 negotiations in progress: 0
Negotiation type: Quick mode, Role: Responder, Message ID: 0
Local: 1.1.1.2:500, Remote: 2.2.2.2:500
—(more)—[/code]
From the information provided, it’s evident that the KTM device is acting as a responder for IKE negotiation and most of the other information include parameters defined during proposal creation. It also displays the traffic statistics and status of IKE SA.
Next, let’s check the status of IPSec Phase II or IPSec Security Association.
[code language=”bash”]root@KTM> show security ipsec sa
Total active tunnels: 1
ID Algorithm SPI Life:sec/kb Mon lsys Port Gateway
<2 ESP:aes-128/sha1 f91310cc 3398/ unlim – root 500 2.2.2.2
>2 ESP:aes-128/sha1 264612fd 3398/ unlim – root 500 2.2.2.2[/code]
Similarly, we can use other monitoring commands like:
[code language=”bash”]root@KTM> show security ipsec statistics
root@KTM> show security flow session[/code]
To test the traffic flow through the IPSec tunnel, we can just ping some host in one LAN from a host in another remote LAN. Since our security policy is configured to allow ICMP traffic, the hosts should be pingable from each other. On pinging hosts over IPSec tunnel, we can also monitor the traffic flow in the vSRX device.
[code language=”bash”]root@KTM> show security flow session
Session ID: 198, Policy name: PKR-KTM-VPN/9, Timeout: 2, Valid
In: 172.16.2.2/1 –> 172.16.1.2/30209;icmp, If: ge-0/0/0.0, Pkts: 1, Bytes: 84
Out: 172.16.1.2/30209 –> 172.16.2.2/1;icmp, If: ge-0/0/1.0, Pkts: 1, Bytes: 84
Session ID: 199, Policy name: KTM-PKR-VPN/7, Timeout: 2, Valid
In: 172.16.1.2/3 –> 172.16.2.2/30977;icmp, If: ge-0/0/1.0, Pkts: 1, Bytes: 84
Out: 172.16.2.2/30977 –> 172.16.1.2/3;icmp, If: ge-0/0/0.0, Pkts: 1, Bytes: 84
Session ID: 200, Policy name: PKR-KTM-VPN/9, Timeout: 2, Valid
In: 172.16.2.2/2 –> 172.16.1.2/30209;icmp, If: ge-0/0/0.0, Pkts: 1, Bytes: 84
Out: 172.16.1.2/30209 –> 172.16.2.2/2;icmp, If: ge-0/0/1.0, Pkts: 1, Bytes: 84[/code]
Another tool we can use is traceroute from the host itself. Let’s try to trace the packet from a host belonging to KTM to a host belonging to PKR. The result looks like this:
[code language=”bash”]$ traceroute 172.16.2.2
traceroute to 172.16.2.2 (172.16.2.2), 30 hops max, 46 byte packets
1 172.16.1.1 (172.16.1.1) 44.700 ms 3.276 ms 4.544 ms
2 2.2.2.2 (2.2.2.2) 49.048 ms 15.659 ms 19.628 ms
3 172.16.2.2 (172.16.2.2) 19.543 ms 39.007 ms 24.301 ms[/code]
This completes this blog post on how to setup Policy Based IPSec VPN between Juniper Networks devices. I hope you’ve found it useful. Please let me know of your feedback and suggestion in the Comments section below. Thank you for reading! 🙂
Leave a Reply