Welcome! This is gonna be yet another post on setting up Wi-Fi Hotspot using CoovaChilli. I’m again writing in this topic because it has been the most searched for and viewed post in my whole blog. I’ve also received some private requests from people across the world regarding this subject. So, I’m going to dedicate this post on setting up a basic hotspot solution in a Ubuntu machine using Coova and Hostapd.
Project Overview
The host system being used here is Ubuntu 16.10. I’ll install CoovaChilli, FreeRadius, HostApd, and BIND in this system to prepare my hotspot system. Here are the roles and purposes of the mentioned packages:
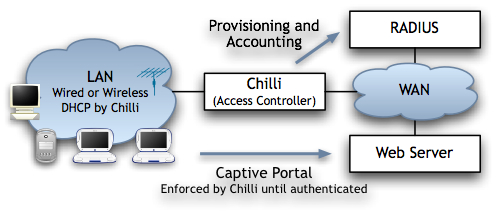
CoovaChilli: To act as an access controller for the hotspot. It intercepts the wireless traffic and redirects the client to the captive portal for login. Once authenticated, the user can access the Internet or the networks allowed (Walled Garden scenario) by the controller. It utilizes IPTables to control network access and also to NAT wireless traffic in order to reach external networks. It utilizes BIND or DNSMasq for DNS resolutions in Wi-Fi clients.
HostApd: It is responsible for launching a Wi-Fi beacon from the wireless adapter. In other words, it converts the wireless interface into an Access Point and also manages it. We define our Wi-Fi signal related configurations here.
FreeRadius: I hope you’re aware of AAA (Authentication, Authorization and Accounting). Well, Radius server is one of the tools to achieve it. FreeRadius, which is an open-source radius server, can be used as an external authentication server in our scenario. If you don’t require to have AAA in your hotspot system, you can ignore this part and perhaps may go for local authentication or even no authentication as well.
BIND: It is an open-source DNS server. It is responsible for serving DNS requests to the hotspot users. You can alternatively use DNSMasq or other tools for this purpose.
IPTables: IPTables is a linux-kernel firewall used to control network firewall chains of the system. Along with traffic accept, drop and reject, it can also be used to NAT traffic.
EasyHotspot: It is a web-based tool to manage our hotspot system for user management and billing. It coordinates with CoovaChilli and FreeRadius to perform its roles.
LAMP: It’s an abbreviation for Linux, Apache, MySQL and PHP. Linux is the host operating system here. MySQL is used by FreeRadius to store users’ information and is also used by EasyHotspot to store its contents. Apache and PHP are required by EasyHotspot to serve dynamic web pages to the user. LAMP can be utilized by the CoovaChilli as well to create custom captive portal and walled garden environment.
Installing CoovaChilli
Before installing CoovaChilli, let’s first install its dependency. Haserl, a CGI Interpreter to serve cgi web scripts, is one of the main pre-requisites for Coova to display captive portal.
[code language=”bash”]
sajjan@learner:~$ sudo apt-get install haserl
[/code]
<strong>NOTE</strong>: If you’re using Ubuntu 16.10, you’re ready to go. But if you’re using Ubuntu 16.04, you’ll encounter a problem later. You’ll face connection reset error in your captive portal page. To resolve this issue, you need to install latest version of *Haserl, which I couldn’t get through Ubuntu 16.04’s repos. So, I downloaded the latest Debian package for it, and manually installed it. Keeping this in mind will help you avoid one of the problems I faced.
Next, download the Debian package I built from the current latest version of CoovaChilli’s source code. It is available here:
[code language=”bash”]
sajjan@learner:~$ wget https://blog.sajjan.com.np/CoovaChilli/coova-chilli_1.3.0_amd64.deb
sajjan@learner:~$ sudo dpkg -i coova-chilli_1.3.0_amd64.deb
[/code]
Or, if you feel like being adventurous, you can try a more challenging way i.e. compiling and building your own installation package of CoovaChilli from source code. Remember that this method will take a lot of time for compilation and make, and it’s also prone to various issues. So, if you’re in hurry or don’t have enough skills to get through this step, just follow the above step.
[code language=”bash”]
sajjan@learner:~$ wget https://github.com/coova/coova-chilli/archive/1.3.1.4.tar.gz
sajjan@learner:~$ tar xzvf 1.3.1.4.tar.gz
sajjan@learner:~$ cd coova-chilli-1.3.1.4/
# Install the build tools and dependencies
sajjan@learner:~$ sudo apt-get install devscripts debhelper autoconf build-essential dpkg-dev gengetopt libcurl4-openssl-dev libssl-ddp ev libtool
# build debian package out of source code
sajjan@learner:~$ debuild -b
[/code]
NOTE: Debuild is more likely to give you numerous errors while trying to build your package. So, be sure to observe the error messages closely and research about their resolutions. I had my share of troubles during this step, which I didn’t keep record of. Thus, I cannot include them here. However, I successfully built it at last and that’s the package I provided you above.
Once CoovaChilli is installed, we can begin configuring it. To do so, let’s open the defaults configuration file (/etc/chilli/defaults) for coova. Make sure to set the following statements as per your scenario:
[code language=”bash”]
HS_WANIF=enp1s0 # WAN Interface toward the Internet
HS_LANIF=wlp2s0 # Subscriber Interface for client devices
HS_NETWORK=10.10.10.0 # HotSpot Network (must include HS_UAMLISTEN)
HS_NETMASK=255.255.255.0 # HotSpot Network Netmask
HS_UAMLISTEN=10.10.10.1 # HotSpot IP Address (on subscriber network)
# OpenDNS Servers
HS_DNS1=10.10.10.1
HS_DNS2=8.8.8.8
HS_RADSECRET=sajjan@123# # Set to be your RADIUS shared secret
HS_UAMSECRET=sajjan@123# # Set to be your UAM secret
[/code]
Once the defaults file is ready, let’s copy it to main config file (/etc/chilli/config). This config file is loaded every time the Coova process is started. Let’s also turn on chilli to be started in system startup.
[code language=”bash”]
sajjan@learner:~$ sudo cp /etc/chilli/defaults /etc/chilli/config
sajjan@learner:~$ sudo vi /etc/default/chilli
START_CHILLI=1
CONFFILE="/etc/chilli.conf"
HS_USER="chilli"
sajjan@learner:~$ sudo systemctl start chilli
sajjan@learner:~$ sudo systemctl status chilli
sajjan@learner:~$ sudo systemctl enable chilli
[/code]
If chilli is started properly, you should see a new interface called tun0 displayed while using ifconfig. This interface should get the gateway IP address for your configured hotspot system. To better understand, it’s basically a tunnel interface between your hotspot serving wireless interface (wlp2s0) and externally connected ethernet interface (enp1s0). That means, all your wireless traffic will pass through this tunnel before reaching external networks and Coova can control all these traffic. That’s why clients cannot get to Internet until Coova allows them. And once a client is allowed external access, Coova masquerades or NAT’s this traffic through the ethernet interface using Iptables.
Here’s the corresponding video tutorial:
Installing HostApd
HostApd is available in the Ubuntu’s main repository, so we can install it without having to add any third-party repository or compiling any source code. Once installed, we need to define a config file so that HostApd can start using its parameters. Finally, we need to set HostApd to refer to our newly created config file by default.
[code language=”bash”]
sajjan@learner:~$ sudo apt-get install hostapd
# Defining a config file for hostapd
sajjan@learner:~$ sudo vi /etc/hostapd/hostapd.conf
interface=wlp2s0
driver=nl80211
ssid=TEST
#hw_mode=g
channel=1
macaddr_acl=0
auth_algs=1
ignore_broadcast_ssid=0
wpa=3
wpa_passphrase=Test@123#
wpa_key_mgmt=WPA-PSK
wpa_pairwise=TKIP
rsn_pairwise=CCMP
# Setting hostapd to use above config file by default
sajjan@learner:~$ sudo vi /etc/default/hostapd
DAEMON_CONF="/etc/hostapd/hostapd.conf"
# Enable hostapd to start in startup
sajjan@learner:~$ sudo systemctl enable hostapd
# Start hostapd
sajjan@learner:~$ sudo systemctl start hostapd
[/code]
Notice that I’ve commented a statement “hw_mode=g” here because in one of the systems I had problem starting HostApd in ‘g‘ mode. Also, I had issues while trying to start hostapd in Ubuntu desktop, while there wasn’t such issue in server edition. I think there is a bug which gets triggered due to conflicts between Network Manager and hostapd as they both try to claim the wireless adapter. I got past this issue in Ubuntu desktop as follows:
[code language=”bash”]
sajjan@learner:~$ sudo nmcli radio wifi off
sajjan@learner:~$ sudo rfkill unblock wlan
sajjan@learner:~$ sudo systemctl start hostapd
sajjan@learner:~$ sudo systemctl status hostapd
[/code]
Here’s the corresponding video tutorial on it.
Installing FreeRadius Server
FreeRadius server is also available in Ubuntu’s repo, so we can simply install it using apt. However, there are some modifications to be made in various config files to enable FreeRadius to use mysql as storage. Note, these steps have been performed for version 2.2.8. The older or later versions might have different ways of doing this. For which, you’ve to refer to the corresponding documentations.
Since these modifications are similar to my earlier post, I’m simply pasting the steps here:
First, open up the file /etc/freeradius/clients.conf. Search for “client localhost“, find the line containing secret statement and set it to your preferred radius password. In my case, I’ve defined it as sajjan@123# and this password is being used by Coova.
Next, open the file /etc/freeradius/radiusd.conf and uncomment the following lines inside module section:
[code]
$INCLUDE sql.conf
$INCLUDE sql/mysql/counter.conf
[/code]
Inside this file, search for instantiate section, and append the following lines:
[code]
max_all_mb
noresetcounter
[/code]
Then, open another file /etc/freeradius/sites-enabled/default. Search the section authorize, and append the same two lines from above in it. Then, along with this section, look for sections accounting, session and post-auth. Inside all these sections, uncomment the line containing sql statement.
Next, open up a file called /etc/freeradius/sql/mysql/counter.conf, and append following lines to its end:
[code language=”bash”]
sqlcounter noresetcounter {
counter-name = Session-Timeout
check-name = Session-Timeout
reply-name = Session-Timeout
sqlmod-inst = sql
key = User-Name
reset = never
query = "SELECT SUM(Acctsessiontime) FROM radacct WHERE UserName=’%{%k}’"
}
sqlcounter max_all_mb {
counter-name = Max-All-MB
check-name = Max-All-MB
reply-name = ChilliSpot-Max-Total-Octets
sqlmod-inst = sql
key = User-Name
reset = never
query = "SELECT SUM(AcctInputOctets)/(1024*1024) + SUM(AcctOutputOctets)/(1024*1024) FROM radacct WHERE UserName=’%{%k}’"
}
[/code]
Lastly, let’s open the file called /etc/freeradius/sql.conf. Inside it, search for the section sql and append the following lines to it.
[code language=”bash”]
database = "mysql"
driver = "rlm_sql_${database}"
server = "localhost"
#port = 3306
login = "easyhotspot"
password = "sajjan@123#"
radius_db = "easyhotspot_opensource"
[/code]
Once all these configurations are done, we can start the FreeRadius server for the purpose of external authentication.
Let’s watch this setup in action in this video:
Setting up EasyHotspot
EasyHotspot is an open-source hotspot management solution being developed in Github. We can get it using git, ssh or https download.
[code language=”bash”]
# Cloning through git
sajjan@learner:~$ git clone https://github.com/rafeequl/EasyHotspot
# OR, Getting through https
sajjan@learner:~$ wget https://github.com/rafeequl/EasyHotspot/archive/master.zip
sajjan@leaner:~$ unzip master.zip
# Soft linking EasyHotspot project to Apache’s default document root
sajjan@leaner:~$ sudo ln -s /home/sajjan/EasyHotspot/htdocs /var/www/html/easyhotspot
[/code]
In my case, Apache2 was installed by default in my system. If you don’t have it, install it. We also need PHP and MySQL to serve EasyHotspot. Note that, this project is an old one (with the last commit some 5 years ago) and it uses CodeIgnitor available then. So, it might not work correctly with the latest version of PHP and MySQL. Ubuntu 16.10 comes with PHP7, so we need to install PHP5.6 exclusively here. These are the steps for this:
[code language=”bash”]
sajjan@leaner:~$ sudo add-apt-repository ppa:ondrej/php
sajjan@leaner:~$ sudo apt-get update
sajjan@leaner:~$ sudo apt-get install php5.6 php5.6-mysql php5.6-mbstring php5.6-mcrypt php5.6-xml mysql-server
[/code]
Let’s quickly make few changes to php.ini file to better run EasyHotspot. Open up /etc/php/5.6/apache2/php.ini, search for date.timezone and set it to your timezone. Similarly, search for short_open_tag and set it to On.
[code language=”bash”]
sajjan@learner:~$ sudo vi /etc/php/5.6/apache2/php.ini
date.timezone = Asia/Kathmandu
short_open_tag = On
[/code]
Next, let’s start our MySQL server and start setting up the database for EasyHotspot and FreeRadius. Above I’ve configured FreeRadius’s database to be easyhotspot_opensource, so I’ll create the same in MySQL. Similarly, the database user will be easyhotspot and its password will be sajjan@123#. You may want to set these parameters as per your preference. Just make sure that you keep them consistent everywhere.
[code language=”bash”]
# Connect to MySQL server
sajjan@learner:~$ mysql -u root -p
mysql> SHOW DATABASES;
mysql> CREATE DATABASE easyhotspot_opensource;
mysql> CREATE USER ‘easyhotspot’@’lcoalhost’ IDENTIFIED BY ‘sajjan@123#’;
mysql> GRANT ALL PRIVILEGES ON easyhotspot_opensource.* TO ‘easyhotspot’@’localhost’;
mysql> FLUSH PRIVILEGES;
mysql> exit;
[/code]
Up to now, we’ve created an empty database and a user to access this database. Now, let’s populate this database with the sample schema provided by EasyHotspot. Then, let’s also edit our database config for easyhotspot.
[code language=”bash”]
sajjan@learner:~$ mysql -u root -p easyhotspot_opensource < EasyHotspot/install/database_with_sample.sql sajjan@learner:~$ mysql -u root -p
# select database easyhotspot_opensource
mysql> USE easyhotspot_opensource;
# Display tables of easyhotspot_opensource
mysql> SHOW TABLES;
# Show entries of table radcheck
mysql> SELECT * FROM radcheck;
# Edit database.php to update DB connection parameters
sajjan@learner:~$ vi EasyHotspot/htdocs/system/application/config/database.php
$db[‘default’][‘password’] = "sajjan@123#";
[/code]
Let’s now start our web server and try accessing EasyHotspot from our web browser.
[code language=”bash”]
sajjan@learner:~$ sudo apache2ctl start
[/code]
However, upon browsing the EasyHotspot in web browser, I received an error displayed in below screenshot.

This error and the numerous other errors in EasyHotspot are caused by the strict sql-mode in MySQL. We can confirm it by querying the server’s mode:
[code language=”bash”]
mysql> SELECT @@GLOBAL.sql_mode;
+———————————————————————+
| @@GLOBAL.sql_mode |
+———————————————————————+
| ONLY_FULL_GROUP_BY,STRICT_TRANS_TABLES,NO_ZERO_IN_DATE,NO_ZERO_DATE,ERROR_FOR_DIVISION_BY_ZERO,NO_AUTO_CREATE_USER,NO_ENGINE_SUBSTITUTION |
+———————————————————————+
1 row in set (0.00 sec)
[/code]
We can temporarily solve this issue by setting the sql_mode to some less strict parameter. To permanently resolve it, we should define it inside the my.cnf file of mysql.
[code language=”bash”]
# This is temporary
mysql> SET GLOBAL sql_mode=="NO_ENGINE_SUBSTITUTION";
# This is for permanent
sajjan@learner:~$ sudo vi /etc/mysql/my.cnf
# Append these two lines at the end
[mysqld]
sql-mode="NO_ENGINE_SUBSTITUTION"
sajjan@learner:~$ sudo systemctl restart mysql
[/code]
Once done, let’s refresh the EasyHotspot page in web browser. Now, it works. We can login into the dashboard using username as admin and password as admin123.

Here’s the setup video in action:
Setting Up BIND
I think this is an optional step because in Ubuntu desktop, my hotspot system worked without BIND. Whereas in Ubuntu server, I had to install BIND to get it working. So, it’ll be best to test your hotspot first to verify that the DNS requests are being handled properly. If they aren’t, then you should set up BIND. Here are the steps for that:
[code language=”bash”]
sajjan@learner:~$ sudo apt-get install bind9
sajjan@Learner:~$ sudo vi /etc/bind/named.conf.options
# Uncomment the forwarders definition and set it to your DNS server
forwarders {
8.8.8.8;
};
sajjan@learner:~$ sudo systemctl start bind9
# Verify if it’s listening on port 53
sajjan@learner:~$ sudo netstat -nlp | grep :53
# If other services like systemd-resolv or dnsmasq are claiming port 53, stop them
sajjan@learner:~$ sudo systemctl stop systemd-resolvd
[/code]
Well, this is it! I hope you’ll now be able to setup your own Hotspot solution with this information. I believe that it has been informative and useful. Would appreciate your feedback and queries in the Comments section below. And as always, thanks for reading!
Leave a Reply